React.js
Components
Components are independent & reusable bits of code. They serve the same purpose as JS functions, but work in isolation and return HTML
In the traditional way, we always put most even all sections in a single CSS and JavaScript file, but in React every component has its own CSS and JavaScript files which remain isolated in the whole project.

It is very simple to create components. All you need to do is to create a function and export it, then use it in the root JavaScript file.
Example:
// ./src/myConponent.tsx
const App = () => {
    return (
    <section>
        Hello World!
    </section>)
}

export default App
// ./src/main.tsx
import { createRoot } from 'react-dom/client'
import App from './myComponent.tsx'
createRoot(document.getElementById('root')).render(
<StrictMode>
<App />
</StrictMode>,
)Tips
All component functions should start with an uppercase letter at the beginning and the return value must be HTML code!
JSX (JavaScript XML)
In a component you are only allowed to return a single parent element and you need to close ALL the tags
const App = () => {
    return (
        <div>
            something to show
        </div>
        <div> {// 报错:JSX expressions must have one parent element.}
    )
}

const App = () => {
    return (
        <div>
            <img src="/assets/myImg.png" >
            {// 报错:JSX element `img` has no corresponding closing tag}

            <img src="/assets/myImg.png" /> {// 正确做法}
        </div>
    )
}
But if you really need to pass multiple parent then you can use React Fragment, It’s actually just an empty HTML tag, start with <> and end with </>.
const App = () => {
    return (
        <>
            <div>something to show</div>
            <div>another div</div>
        </>
    )
}
By the way, the code similar to HTML but in React is not completely equal to HTML. There is always something you need to keep in mind!
The table below show the differences between HTML and JSX properties.
| # | HTML属性 | JSX属性 | 示例(已转义) |
|---|---|---|---|
| 1 | class | className | \<div className=\"box\">\<\/div> |
| 2 | for | htmlFor | \<label htmlFor=\"name\">\<\/label> |
| 3 | style | style对象 | \<div style={{ fontSize: \’20px\’ }}>\<\/div> |
| 4 | onclick | onClick | \ |
| 5 | tabindex | tabIndex | \<div tabIndex=\"1\">\<\/div> |
| 6 | checked | defaultChecked | \ |
| 7 | value | defaultValue | \<input defaultValue=\"初始\"\/> |
| 8 | \<img> | 强制闭合 | \<img src=\"pic.jpg\" \/> |
| 9 | colspan | colSpan | \<td colSpan=\"2\">\<\/td> |
| 10 | innerHTML | dangerouslySetInnerHTML | \<div dangerouslySetInnerHTML={{__html: text}}>\<\/div> |
Expressions In JSX
With JSX you can write expressions inside curly braces. The expressions can be a React variable, or property, or any other valid JavaScript expression. JSX will execute the expression and return the result.
const app = () => {

    const myName = "KorinChen"
    const className = "strong"
    const multiply = (x, y) => {
        return x * y
    }

    return (
        <div>
            <h1>Hi, my name is {myName}</h1>
            <p>My fav frults: {["apple","cherry","banana"]}</p>
            <p>1 + 1 = {1+1}</p>
            <p>5 * 5 = {multiply(5,5)}</p>
            <p className="{className}">This is strong class</p>
        </div>
    )
}
Map Lists
In React, you will render lists with some type of look. The JavaScript array.map() array method is generally the preferred method.
Example:
const App = () => {

    const numbers = [1,2,3,4,5,6,7,8,9,10]

    return (
        <main>
            <ul>
                {numbers.map(e => (
                  <li>{e}</li>
                ))}
            </ul>
        </main>
    )

}
About Keys:
The advantages of adding unique key property:
-
Use Keys for Individual Items: When you have Maryland row lists, make sure that each item has a unique key. This key helps React identify which items have changed, been added, or been removed.
-
Avoid Using Indexes as Keys: Using indexes as keys instead of unique identifiers can cause issues, especially when items are added, removed, or reordered. This is because React would otherwise try to optimize memory usage by updating the old indices directly in the DOM, which can lead to bugs.
-
Use Key Prop for All Items with children: If you have lists of items that contain other child elements, use the
keyprop for every element in the component. React will then use these keys to identify which items have changed. -
Optimize re-render Performance: Ensure that you avoid unnecessary re-render. For example, if you calculate a new array and want to update a list, use state to store the new data and update the state, this will trigger a re-render or a forced render if needed.
Tips
Key and value will NOT be appeared in rendered HTML
const App = () => {

  const userInfo = [
    {
      userName: "Korin",
      userAge: 20,
      userEmail: "Korin@anya.com"
    },
    {
      userName: "Anya",
      userAge: 16,
      userEmail: "Anya@anya.com"
    },
    {
      userName: "Kuma",
      userAge: 8,
      userEmail: "Kuma@anya.com"
    },
    {
      userName: "Chen",
      userAge: 21,
      userEmail: "Chen@anya.com"
    }
  ]

  return (
    <main>
      <h1>User Lists:</h1>
      <div className="userLists">
        <table>
          <thead>
            <tr>
              <th>User Name</th>
              <th>User Age</th>
              <th>User Email</th>
            </tr>
          </thead>
          <tbody>
            {userInfo.map(({userName, userAge, userEmail}) => (
              <tr key={userName + userEmail}>
                <th>{userName}</th>
                <th>{userAge}</th>
                <th>{userEmail}</th>
              </tr>
            ))}
          </tbody>
        </table>
      </div>
    </main >
  )
}
Props
Props or Properties are arguments passed into React components and it allows us to pass data from parent component to a child component.
// src/component/User.jsx

const User = (props) => {
    const userInfo = [
        {
            userName: "Korin",
            userAge: 20,
            userEmail: "Korin@anya.com"
        }
    ];

    const foundUser = userInfo.find(user =>
    (
        user.userName === props.userName
    ));

    if (!foundUser) {
        return <div>User not found nya~</div>;
    }

    return (
        <section>
            <h1>Hello {foundUser.userName}</h1>
            <p>Your email is {foundUser.userEmail}</p>
        </section>
    );
};

export default User;
// src/App.jsx
import User from "./component/User"

const App = () => {
    return (
        <User
            userName="Korin"
        />
    )
}
Find()
userInfo.find( user => user.userName === props.userName )In this case, users are registered for fetching all the rows in the userInfo array, then an array function is used to return a boolean to judge whether this row meets the requirement.
Parent Props
Props also can be HTML tags
// src/component/Card.jsx

const Card = ({ children }) => {
    return (
        <div>
            <h1>Hello this is parent element</h1>
            {children}
        </div>
    )
}

export default Card
// src/App.jsx
import Card from "./component/Card"

const App = () => {
  return (
    <Card>
      <p>Hello I am the child props</p>
    </Card>
  )
}
Conditional rendering
Conditional rendering allows us to dynamically display different UI components or content based on specific conditions. This enables us to create more interactive and responsive user experiences.
It is very simple, the conditional rendering statement of React JSX just like if and else statement in JavaScript or TypeScript.
Traditional syntax if and else statement:
const App = () => {
    if (isValid) {
        return <span>True</span>
    } else {
        return <span>False</span>
    }
}
Or you can use the Syntactic sugar: Ternary operator
const App = () => {
    return isValid ? (<span>True</span>) : (<span>False</span>)
}
==New Syntax!==
But in React we have new syntax (short operator) to handle conditional rendering
const App = () => {
    return (
        <>
            { isShowBanner && <WelcomeBanner /> }
        </>
    )
}
Styling
In react inline style is ==slightly different== from the normal way. All attributes follow a conversion rule to be converted, which is to remove the dash symbol and capitalize the first letter of the next word.
| CSS | React Style |
|---|---|
| font-weight | fontWeight |
| background-color | backgroundColor |
| z-index | zIndex |
Inline style
There are some examples.
const App = () => {
    return (
        <section>
            <h1 style={{
                color:"white",
                backgroundColor:"teal"
            }}>Inline style</h1>
        </section>
    )
}

// -----------------------------------

const App = () => {
    const myStyle = {color:"white", backgroundColor:"teal"}
    return (
        <section>
            <h1 style={myStyle}>Inline style</h1>
        </section>
    )
}
Error Examples:
// ❌ 错误1:直接用字符串
style="color: red"

// ❌ 错误2:连字符写法
{ 'font-size': '20px' }

// ❌ 错误3:逗号结尾地狱
{ backgroundColor: 'blue', } // 严格模式会爆炸!
External style
It’s very simple to achieve this, all you need to do is write a statement to import the CSS file, just like importing a CSS file in HTML.
import './index.css';React Feature
Conception
State
State is a way to store and manage data that can change over time and affects how the component renders. We define stat using the useState() Hook, which allows you to set an initial value and provides a way to update that state.
React Hooks
In React, all the functions that follow useXxx() patten are hooks.
Hooks are a new addition in React 16.8. They let you use state and other React features without writing a class.
useState()
useState(): useState() Hook allows us to track state in a functional component. State generally refers to data or properties that need to be tracking in an application.
const [data, changeData] = useState()Example:
const App = () => {

  const [counter, setCounter] = useState(0)
  const increacement = () => setCounter(counter + 1)

  return (
    <>
      <h1>{counter}</h1>
      <button onClick={increacement}>Click Me!</button>
    </>
  )
}

// ----------------------------------------------------

const App = () => {

  const [counter, setCounter] = useState(0)

  return (
    <>
      <h1>{counter}</h1>

      {//错误写法:}
      <button onClick={setCounter(counter + 1)}>Click Me!</button>
      {//❌:页面渲染时会立即调用这个函数导致re-render过多。}

      {//正确写法:}
      <button onClick={() => setCounter(counter + 1)}>Click Me!</button>
    </>
  )
}
const UseState = () => {
const [myName, setName] = useState(() => {
const savedName = localStorage.getItem("name");
return savedName ? JSON.parse(savedName) : "";
});
useEffect(() => {
localStorage.setItem('name', JSON.stringify(myName));
}, [myName])
return (
<>
<h1>Your Name is {myName}</h1>
<input type="text" value={myName} onChange={(event) => setName(event.target.value)} />
</>
)
}Tips
TheonClickattribute (in React) isn’t like theonclickproperty in HTML — you can’t use direct function calls, because it will call this function immediately when the page was rendered.
useEffect()
useEffect(): useEffect() in React works like a trigger. When the state or variables listed in the dependency array are updated, the useEffect() function will execute.
Example:
import React, { useEffect, useState } from 'react';

function MyComponent() {
  const [count, setCount] = useState(0);

  useEffect(() => {
    console.log(`计数器更新啦!当前值是:${count}`);

    // 可选的清理函数
    return () => {
      console.log('清理副作用啦!');
    };
  }, [count]); // 只有 count 变化时才触发

  return (
    <div>
      <p>计数值:{count}</p>
      <button onClick={() => setCount(count + 1)}>增加计数</button>
    </div>
  );
}
No Dependency Array
In flowing cases, useEffect() depends an empty array or have no depends.
==Triggered once==
It will be only be triggered when component has been mounted or unmounted
useEffect(() => {
  console.log('组件挂载啦!');
  return () => console.log('组件卸载啦!');
}, []);
==Triggered on every rendered==
It will be triggered every time the component re-renders.
useEffect(() => {
  console.log('组件重新渲染啦!');
});
==Triggered at regular intervals==
In this case, the function will execute regularly using a timer.
useEffect(() => {
  const timer = setInterval(() => {
    console.log('定时器在运行呢!');
  }, 1000);

  return () => {
    clearInterval(timer); // 清理定时器
    console.log('清理定时器啦!');
  };
}, []);
Cautions
- Dependency array must be accurate: Missing dependencies may lead to unexpected behavior, such as stale data or infinite loops.
- Avoid using async directly in
useEffect: Instead, define an async function inside the effect and call it.
- Avoid using async directly in
- Prevent unnecessary re-renders: Properly configure the dependency array to avoid triggering costly operations too frequently.
useEffect(() => {
    // ❌: Using an async function directly in useEffect is not allowed.
    const fetchData = async () => {
        const data = await fetch('/api/data');
        console.log(data);
    };
    fetchData();
}, []);
useReducer()
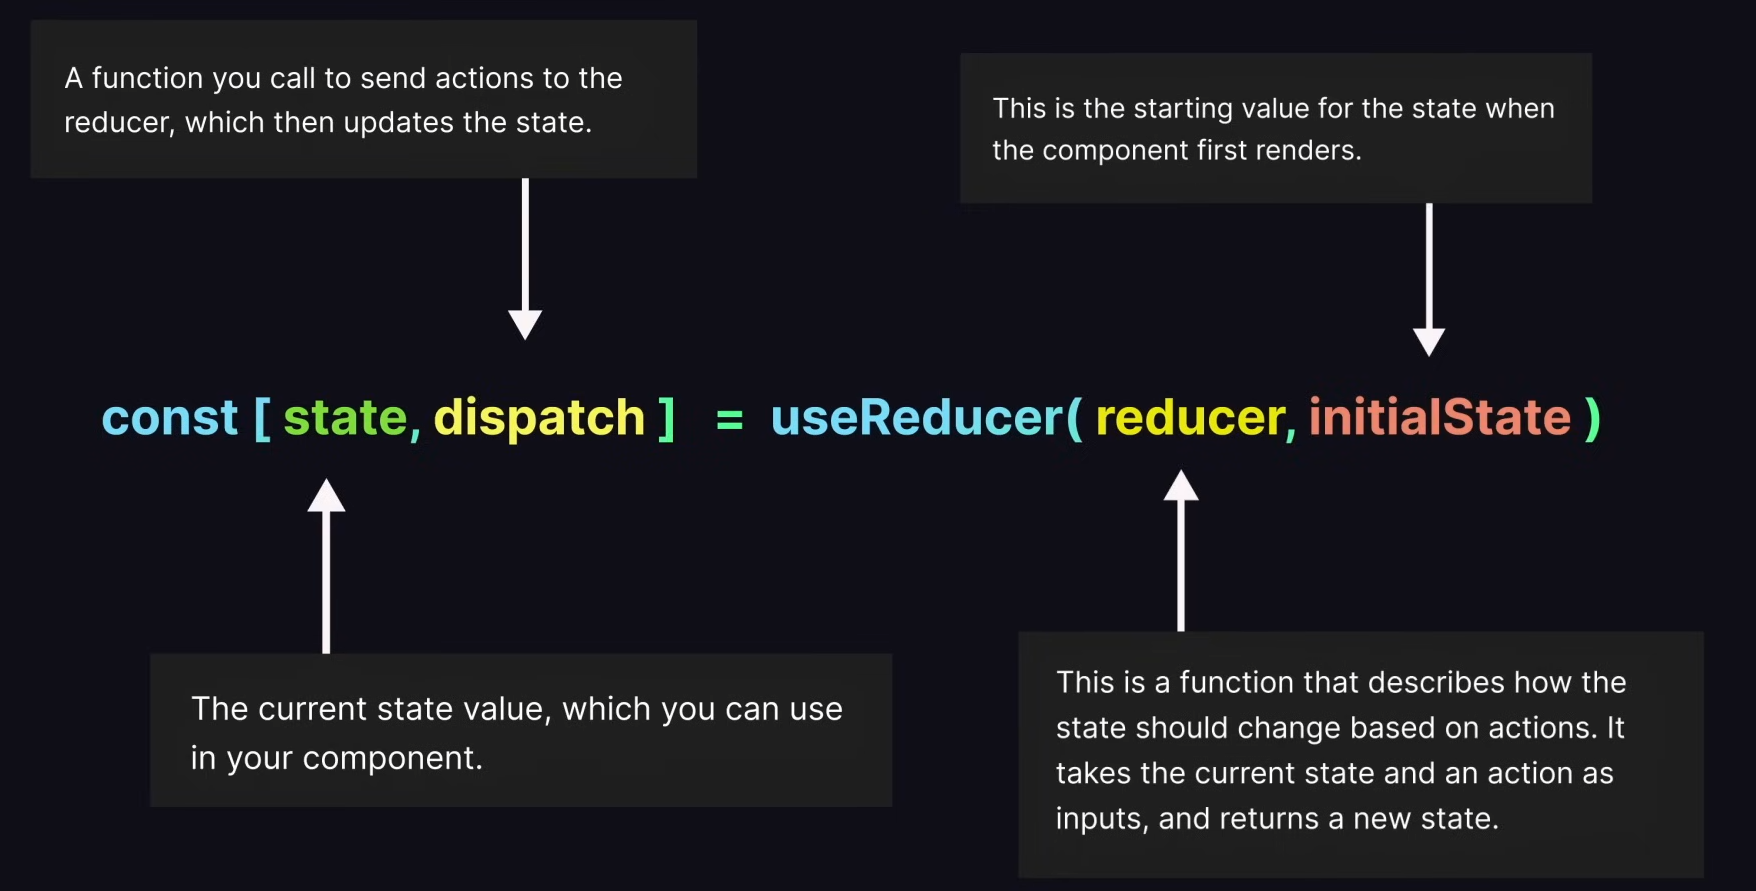
useReducer(): useReducer() is a hook that is similar to useState(), but it is designed for more complex state objects or state transitions that involves multiple sub-values. It allows you to manage state in a function, immutable way.
Basic Syntax:
const [state, dispatch] = useReducer(reducer, initialState)state: The current state value, which you can use in your component.dispatch: A function you call to send actions to the reducer, which then updates the state.reducer: This is a function that describes how the state should change based on actions. It takes the current state and an action as inputs, and returns a new stateinitialState: This is the starting value for the state when the component first renders.
The major difference from useState() is that useReducer() allows you to provide a function that can change the state.
Example of useReducer: a counter
import React, { useReducer } from 'react'

const Counter = () => {
    // useReducer is a hook that is used to manage state in a functional component.
    const initialState = { count: 0 }
    const counterReducer = (state, action) => {
        switch (action.type) {
            case "Increase":
                return { count: state.count + 1 }
            case "Decrease":
                return { count: state.count - 1 }
            case "Reset":
                return initialState
            case "Set":
                return { count: action.payload }
            default:
                return state
        }
    }

    const [state, dispatch] = useReducer(counterReducer, initialState)
    const [value, setValue] = React.useState(0)

    const handleAmountChange = (type, amount) => {
        switch (type) {
            case 'Increase':
                dispatch({ type: 'Set', payload: state.count + amount })
                break;
            case 'Decrease':
                dispatch({ type: 'Set', payload: state.count - amount })
                break;
        }
        setValue(0)
    }

    return (
        <>
            <div>
                <h1>Counter: {state.count}</h1>
            </div>
            <div>
                <button onClick={() => dispatch({ type: 'Increase' })}>Increment</button>
                <button onClick={() => dispatch({ type: 'Decrease' })}>Decrement</button>
                <button onClick={() => dispatch({ type: 'Reset' })}>Reset</button>
            </div>
            <div>
                <br />
                <input type="text" onChange={(e) => setValue(e.target.value)} />
                <button onClick={() => handleAmountChange('Increase', Number(value))}>Increase by {value}</button>
                <button onClick={() => handleAmountChange('Decrease', Number(value))}>Decrease by {value}</button>
            </div>
        </>
    )
}

export default Counter
useRef()
useRef(): useRef() Hook provides a way to access and Interact with DOM elements or to persist values across renders without causing a re-render.
import React, { use, useRef } from 'react'

const App = () => {

  // useRef is used to get a reference to the DOM element
  // use is used to get the value of the element

  // useRef example
  const inputRef = useRef(null)

  const handleClick = () => {
    // current is a reference to the DOM element
    inputRef.current.focus()
    inputRef.current.value = 'Hello World'
  }

  return (
    <div>
      <input ref={inputRef} type="text" />
      <button onClick={handleClick}>Focus Input</button>
    </div>
  )
}

export default App
useId()
useId(): The useId() hook in React is used to generate globally unique IDs for components.
import React, { useId } from 'react';

const App = () => {
  const id = useId();

  return (
    <>
      <label htmlFor={`${id}-username`}></label>
      <input type="text" id={`${id}-username`} />

      <br />

      <label htmlFor={`${id}-password`}></label>
      <input type="password" id={`${id}-password`} />
    </>
  )
};

export default App;
Custom Hook
Custom Hooks are JavaScript functions that start with the prefix use (e.g. useFetch, useForm) and can call other hooks within them. They allow you to extract and reuse logic that involves state or side effects, making your components more readable and maintainable.
/src/utils/useFetch.jsx
import React, { useEffect, useState } from "react";
import axios from "axios";

const useFetch = (url) => {
    const [data, setData] = useState([]);
    const [error, setError] = useState(null);

    useEffect(() => {
        const fetchData = async () => {
            try {
                const result = await axios.get(url);
                setData(result.data);
            } catch (err) {
                console.error(err);
                setError("Something went wrong");
            }
        };

        if (url) {
            fetchData(url);
        };
    }, [url]);
    return [data, error];
};

export default useFetch;
/src/App.jsx
import React from 'react';
import useFetch from './utils/useFetch';

const App = () => {
  const [data, error] = useFetch('https://jsonplaceholder.typicode.com/posts'); // 解构返回值

  if (error) {
    return <h3>Something went wrong: {error}</h3>; // 显示错误信息
  }

  if (!data || data.length === 0) {
    return <h3>Loading...</h3>; // 显示加载状态
  }

  return (
    <div>
      <h1>Posts</h1>
      <ul>
        {data.map((e, index) => (
          <li key={index}>
            {e.title}
          </li>
        ))}
      </ul>
    </div>
  );
};

export default App;
Portal
Portal is a feature that allows you to render a child component info a DOM node that exists outside the hierarchy of the parent component. This can be useful for scenarios like modals, tooltips, or dropdown, where you want to break out of the usual parent-child structure and render in a different part of the DOM.
import React from 'react';
import ReactDOM from 'react-dom';

class MyPortal extends React.Component {
  render() {
    return ReactDOM.createPortal(
      this.props.children,
      document.getElementById('portal-root')
    );
  }
}

// 在主应用组件中使用 MyPortal
class App extends React.Component {
  render() {
    return (
      <div>
        <h1>App Component</h1>
        <MyPortal>
          <h2>This is rendered using a portal!</h2>
        </MyPortal>
      </div>
    );
  }
}

// 在 HTML 中,我们需要有一个 id 为 'portal-root' 的元素
// <div id="portal-root"></div>
Context API
Context API is a feature that allows you to Manage and Share state across your component tree without having to pass props down manually at every level. It’s useful for scenarios where you need to share data or functions across many components, especially when these components are deeply nested. At that time, you can use createCountext() to deal with.
Tips
If a component that is not a child component wants to usecreateContext(), you might need to export thiscreateContext()and specify the path to thecreateContext()file.Tips
There are many ways that you can access your data fromcreateContext().One is using the
<Context.Consumer>tag and using{value => <div>Context Value: {name}</div>}to get the value from parent. In this case you must use arrow function to get the value, otherwise react will treat it like a variable.The other one is using
const value = useContext(MyContext);statement and using{value}to access it.
Normal pattern
// /src/App.jsx
import {createContext} from 'react'

const App = () => {
  const MyContext = createContext();

  const name = "Korin"
  return (
    <>
      <MyContext.Provider value={name}>
        <ComponentA /> {// The ComponentA included the ComponentB}
      </MyContext.Provider>
    </>
  );
}

export default App
// src/Components/ComponentB.jsx
// the ComponentB is the child component of App component
import React from 'react';
const ComponentB = () => {
return (
<MyContext.Consumer>
{name => <div>Context Value: {name}</div>}
</MyContext.Consumer>
);
}
export default ComponentB// src/Components/ComponentD.jsx
// the ComponentD is NOT the child component of App component
import React from 'react';
import MyContext from '../App';
const ComponentD = () => {
return (
<MyContext.Consumer>
{name => <div>Context Value: {name}</div>}
</MyContext.Consumer>
);
}
export default ComponentDuseContext() pattern
// /src/App.jsx
import {createContext} from 'react'

const App = () => {
  const MyContext = createContext();

  const name = "Korin"
  return (
    <>
      <MyContext.Provider value={name}>
        <ComponentA /> {// The ComponentA included the ComponentB}
      </MyContext.Provider>
    </>
  );
}

export default App
// src/Components/ComponentB.jsx
// the ComponentB is the child component of App component
import React from 'react';
import {useContext} from 'react'
const ComponentB = () => {
const myValue = useContext(MyContext)
return (
<>
<div>Context Value: {myValue}</div>
<>
);
}
export default ComponentB// src/Components/ComponentD.jsx
// the ComponentD is NOT the child component of App component
import React from 'react';
import {useContext} from 'react'
import MyContext from '../App';
const ComponentD = () => {
const myValue = useContext(MyContext)
return (
<>
<div>Context Value: {myValue}</div>
</>
);
}
export default ComponentDTSX(TypeScript XML)
Now you can use TypeScript to code with React framework, so now you will get the all of TypeScript’s features in React. [[A00-Study/Development/Web Development/07.TypeScript|TypeScript Fundamental]]
Type verification
There are a lot of ways to define types in tsx file, just like define types in ts file.
One way is using Property variable to handle it.
import React from 'react'

const User = (
  props: {
    name: string,
    age: number,
    isStudent?: boolean
  }) => {
  return (
    <div>
      {prop.name}, {prop.age},
      {prop.isStudent ? <>isTrue</> : <>isFalse</>}
    </div>
  )
}

export default User
You can also use Type to define types just like in normal way.
import React from 'react'

type UserShape = {
  name: string,
  age: number,
  isStudent?: boolean
}

const User = ( { name, age, isStudent }: UserShape ) => {
  return (
    <div>
      {name}, {age}, {isStudent ? <>isTrue</> : <>isFalse</>}
    </div>
  )
}

export default User
Interface also can do this!
import React from 'react'

interface UserShape {
  name: string,
  age: number,
  isStudent?: boolean
}

const User = ({ name, age, isStudent }: UserShape) => {
  return (
    <div>
      {name}, {age}, {isStudent ? <>isTrue</> : <>isFalse</>}
    </div>
  )
}

export default User
or some crazy way…
import React from 'react'

const User = (
  { name,
    age,
    isStudent
  }: {
    name: string,
    age: number,
    isStudent?: boolean
  }
) => {
  return (
    <div>
      {name}, {age}, {isStudent ? <>isTrue</> : <>isFalse</>}
    </div>
  )
}

export default User
But in React there is a more easy way to achieve this, It’s the FC, which is also called functional component, It can helps to define types easier.
import { FC } from "react"

interface UserShape {
  name: string,
  age: number,
  isStudent: boolean
}

const User: FC<UserShape> = ({ name, age, isStudent }) => {
  return (
    <>
      {name}, {age}
      {isStudent ? <>isTrue</> : <>isFalse</>}
    </>
  )
}

export default User
Tips
React FC can cause some problems!
FC will adding children type automatically event they are not be defined.
==Something that you need to attention==
import React, { FC } from 'react';

interface Props {
  name: string;
}

const MyComponent: FC<Props> = (props) => {
  return <p>Hello, {props.name}!</p>;
};

export default MyComponent;
<MyComponent name="Anya" /> // ✅The right way.
<MyComponent name="Anya">额外的内容</MyComponent> // ❌The wrong way!The type of React children
But there is something new! React children! React allows you to define the child element in a component, so if we want to use TypeScript to add that, what type should React children be defined as?
Yep, It’s the ReactNode Type!
import React, { ReactNode } from 'react'

interface ChildrenShape {
  children: ReactNode
}

const Child = ({ children }: ChildrenShape) => {
  return (
    <>
      {children}
    </>
  )
}

export default Child
React 19 Features
Main Features
Compiler
React 19 now includes its own compiler, which will not only speed up performance but also automate certain tedious tasks, reducing the workload for developers.
Memorization
With React 19’s new compiler, there is no longer a need for memorization the process of optimizing components to prevent unnecessary re-renders. Previously, we relied on hooks like useMemo() and useCallback() for this purpose, but these will now become obsolete.
Metadata
We no longer need to install third-party packages for SEO and metadata because React 19 now offers built-in support for these features. We can place the tags anywhere within the component and it will work for both the client and server.
Directives
React 19 now includes built-in support for use client and use server directives. This allows components top be rendered on the server, resulting in improved SEO, faster page load times, and more straightforward data fetching.

New Hook
use()
The use() hook let’s you read and load resources asynchronously, such as promises or context. Unlike other hooks, it can be utilized in loops and conditionals.
In certain situations, it can serve as a placement for useEffect() when fetching data, and it streamlines context usage by allowing you to use use(<countext>) instead of useContext(<contex>).
Actions
React 19 introduces Actions, which are are asynchronous functions designed to simplify form submissions. Actions can be utilized on both the client and server sides.
useFormStatus()
useFormStatus is a Hook that gives you status information of the last form submission.
Syntax:
const [pending, data, netgid, action] = useFormStatus();useActionState()
useActionState is a Hook that allows you to update state based on the result of a form action.
Syntax:
const [state, formAction] = useActionState();